Hardwood floor refinishing is an affordable way to freshen up your entire home. Whether your floors are marked up from furniture or out of style, the process is relatively hassle-free and breathes new life into your home’s appearance.
Having your hardwood floors refinished requires clearing the room, sanding the boards down, applying stain, and then sealing the floors. Here’s the step-by-step process:
The most critical step in refinishing hardwood floors is the preparation process. You’ll need to clear the room of furniture and other items, remove baseboards, and seal air vents so you don’t introduce dust into your home during refinishing. You’ll also need a large drum sander, proper safety equipment, and plenty of space to work.
Once the old finish is removed, you can start to sand the floor. Whether you’re doing this by hand or using an electric sander, it’s important to follow the proper sequence and use a fine grit sandpaper for best results. Be sure to vacuum between each sanding, and always wear a mask. If you’re unsure of what grit to start with, ask your flooring specialist for advice.
After sanding, the wood needs to be cleaned thoroughly, including the trim and baseboard. This will ensure that there isn’t any dirt or grit left on the floor, which can scratch it during the buffing process. It’s also important to remove shoe molding — sometimes called quarter-round — from the perimeter of the room. This can be done by inserting a small utility knife between the trim and hardwood and gently prying it away.
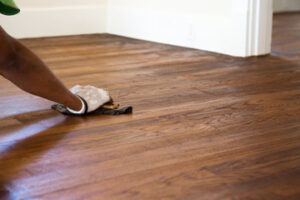
Depending on the style of floor you want, you can either stain or varnish the hardwood. Stain will give you a color that suits your design preferences, while varnish provides the protection and sheen. It’s essential to choose an oil-based stain with low volatile organic compounds (VOC) and a tinting base so you can control the final color.
Once the stain is dry, you can apply a coat of polyurethane. This will protect the floor and give it a nice sheen, which can be anywhere from matte to high-gloss. You should let the final coat dry completely before walking on it or reintroducing furniture. You’ll also need to let it dry for a day or two before you can reinstall the baseboards and trim. While refinishing your hardwood can be a DIY project, it’s best to hire a professional. They have the right equipment and expertise to get the job done quickly and effectively.
Sanding
If your hardwood floors are showing signs of age, you may need to sand them down and refinish them. This is an expensive project, but if your floors are worn and scratched or just don’t look good, it can be worth the investment. The process involves stripping the old finish off and then sanding the boards until they are smooth. It’s important to use the correct sanding equipment and wear proper safety gear. After sanding, the wood is stained and then varnished to protect it from water and daily wear.
The first step in sanding is to use a large drum sander to remove the top layer of the board. You can rent a sanding machine or buy one at a home improvement store. Make sure you have plenty of room to work and that you’re wearing a dust mask.
Next, you’ll need to use a grit sequence that matches the condition of your flooring. It’s also a good idea to use a vacuum or dust extractor between each sanding cycle. You can start with a coarse grit and work your way down to a fine grit. Be sure to check for protruding nails and hammer them down if necessary. It’s important that any nail holes are filled in with a wood filler before refinishing.
Once the holes have been filled, you can sand the boards again with a medium grit. You should then clean the surface of the boards and allow them to dry thoroughly. At this point, you should also stain the floor, if desired. It’s a good idea to choose an oil-based stain, which will last longer, or a water-based stain, which is easier to clean up.
Once the stain has dried, it’s time to apply a topcoat of finish. Most people choose polyurethane, which is a clear liquid that protects the hardwood. It comes in a variety of sheens, from matte to glossy, and helps the natural color of the wood shine through. A polyurethane coat also helps resist scratches and stains. Most manufacturers recommend three coats of finish, and each should be allowed to dry completely between applications.
Staining
Staining is a major step in the refinishing process, and it can make or break your floor’s appearance. If not done properly, it can accentuate sanding marks and leave you with a floor that looks gritty and unfinished. It’s essential to use the right products, and follow proper staining procedures to ensure a professional-looking finish.
Before you can stain, make sure the room is clean and clear of furniture, rugs, and any other obstacles. Vacuum the floors and wipe down surfaces with a damp cloth to remove any dust or specks of dirt. You should also mask off baseboards and vents with painter’s tape and plastic sheeting to protect them from the stain.
First, decide if you want to use an oil-based or water-based stain. Each has its own advantages and disadvantages. Oil stains are durable, but they also take longer to dry and can require multiple coats for an even color. Water-based stains, on the other hand, are eco-friendly and dry quickly. However, they can leave behind a film of moisture on the surface, which can cause the wood to feel sticky or tacky.
When you’re ready to start, choose a color that compliments the existing decor and style of your home. There are a wide range of colors to choose from, but it’s important to remember that different types of wood react differently to stains. For example, white oak has a very open grain, which means it absorbs stains well. However, red oak has a tighter grain and may not absorb stains as easily. You can prevent this from happening by using a stain controller, which fills the pores of the wood and helps the stain to be absorbed evenly.
Once the stain has dried, you can buff it with a clean cloth to remove any unevenness and to smooth out the appearance. If you’d like to protect the finish, apply a final coat of polyurethane. This will help the finish resist scuffing and abrasions, while protecting the hardwood from future spills and scratches.
If you’re not comfortable with applying a polyurethane coating yourself, you can hire a contractor to do it for you. But it’s crucial to hire someone who is experienced and familiar with this type of work. A mistake here could cost you hundreds or thousands of dollars in the long run.
Sealing
Once sanding is complete and stain is applied (if desired), it’s time to seal the hardwood floor. It’s a good idea to use a polyurethane finish, which is durable and looks great. There are many different finishes available, from water-based to oil-based, and each has its own benefits and drawbacks. For example, oil-based polyurethane can yellow with age, whereas water-based polyurethane doesn’t have this problem.
Once the final coat of sealant is on, let it dry. This can take up to a day or so, depending on the brand and how thick it is applied. During this time, it’s important to keep the floor away from water and other household chemicals, which can damage the finish. It’s also a good idea to close all doors and windows, as the sealant may emit harmful vapors.
Before you apply the last coat of sealant, do a smell test. If the finish emits a strong, unpleasant odor, it’s best to choose a different product. Also, be sure to allow plenty of time for the sealant to dry before bringing in furnishings.
While refinishing hardwood floors is not an easy task, it’s well worth the effort in the long run. If you’re not comfortable doing the work yourself, hiring a professional is an excellent option. The right refinishing job will leave your home with gorgeous, gleaming floors that will look new for years to come.
As a general rule, hardwood floors need to be refinished every three to five years. This process involves sanding the existing floor and then applying two or more coats of a protective varnish. The type of finish used depends on the type of wood, the level of foot traffic and the owner’s preferred aesthetic. Some people prefer the natural, porous look of unfinished wood, while others like a glossy shellac-like appearance. Penetrating oil finishes are the least expensive, but they’re also the least durable and require frequent re-oiling. To maintain the quality of a penetrating oil finish, it’s important to use only recommended cleaners and sweeping equipment, and to place felt pads under all furniture.