Most cabinet surfaces need to be scuffed and lightly sanded before priming. After sanding, wipe away dust with a damp cloth or tack rag.
Empty cabinets and remove hardware before beginning your project. Protect floors and countertops with drop cloths or brown builder’s paper. Tape off any areas that touch other surfaces, such as walls and backsplashes, with painter’s tape. Contact Cabinet Painting Sacramento for professional help.
Whether you’re painting over existing cabinets or installing new cabinetry, the process starts with prepping the surface. This can include sanding, priming and cleaning to ensure the best results. For most projects, the goal is to get a smooth finish without any cracks or chips in the paint. The type of paint you use can also make a difference in the final outcome. You can choose from water-based latex or oil-based alkyd options. Consult with an expert at your local paint store to determine which option is best for your project.
First, empty the cabinets and remove all doors and drawers. Label the hardware you plan to reinstall in order to make it easier to put things back in the right place when you’re finished. Use a painter’s tape to cover any areas where you don’t want to paint, such as countertops and appliances.
Once the surfaces are clean, sand them lightly to prepare them for primer and paint. A good sanding will create a rough surface that helps the new coating adhere better. Unless your cabinets have a protective lacquer coat on them, this is an important step that you can’t skip.
After sanding, clean the surfaces again using a degreaser and shop towels. This will remove any grease, dirt and other grime that may have built up over time. You can even apply a coat of liquid de-glosser to spruce up the surfaces and help them look like new again.
Depending on the materials your cabinets are made from, you’ll need to decide if you’re going to apply a coat of primer or not. For example, particleboard and medium-density fiberboard (MDF) have a tendency to absorb moisture, so a primer will help the paint stick to the surface.
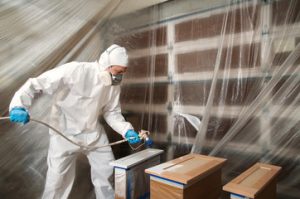
When selecting primer, look for a product specifically designed for high-use surfaces. This will give the primer a stronger bond both mechanically and chemically to the cabinet material for a more durable and uniform finish. You can even find products that are designed to resist scratching for added protection. If you’re using an oil-based primer, be sure to follow the directions for application carefully to ensure a proper, long-lasting finish.
Primer
Paint adheres to surfaces better when they’re coated with a primer. That’s why it’s important to take the time to apply primer when painting cabinets — and make sure you choose the right kind for your specific cabinet materials. In addition to giving the new coat a better base, the primer helps prevent moisture damage and hides any current stains that may show through your topcoat. It’s like the glue that connects your paint to your cabinets — and without it, you could end up with bubbling or peeling in no time.
Before you even open a can of primer, it’s important to clean your cabinets thoroughly — removing any dust or dirt that may interfere with the adhesion of your new coat. It’s also a good idea to lightly sand the cabinet surface with sandpaper (150 or 180 grit is ideal) to remove any sheen and create a smooth, even base for your primer and paint.
There are a variety of different types of primer, so it’s important to pick one that’s compatible with your cabinet material. For wood, a water-based latex primer is a great choice. It dries quickly and has low VOCs, which means it’s safer for indoor use. Water-based primers also clean up easily with soap and water. Oil-based primers offer superior durability, but they require the use of respiratory protection and proper ventilation, as well as extra clean-up steps.
Stain-blocking primers are excellent for hiding nicotine or other stains, and they help prevent them from bleeding through your topcoat. However, they can be expensive and take longer to dry than other types of primer. Adhesion primers work well on slick surfaces, like laminate, and help the new paint adhere to the old surface. However, they don’t hide stains as well as stain-blocking primers do.
Finally, there are shellac-based and alcohol-based primers, which provide superior adhesion for all types of surfaces, including metal. They have a long history of professional use and are great for hiding stains. They’re expensive, however, and they produce a lot of fumes, so it’s best to use them outdoors or in a well-ventilated area.
Paint
Cabinet painting involves applying a coat of paint over the cabinet surface. This method allows for a broad selection of color options and masks a variety of imperfections in the wood, making it ideal for creating a specific aesthetic in your kitchen. A well-applied coat of paint can also provide protection from wear and tear, extending the life of your cabinets.
To make sure your new coating adheres and produces a smooth and even finish, you need to properly prepare the cabinet surfaces before painting. This can include filling in dents, cracks, and gauges for a seamless look. It also means sanding the surfaces after priming with very fine grit sandpaper to create a soft texture that will absorb the paint and provide an attractive appearance.
There are many different types of paint, ranging from oil-based to latex to water-based. Each has its strengths and weaknesses, so you need to choose the right one for your cabinet project. For example, oil-based paints offer a durable finish that is suitable for high-traffic areas. However, they also produce strong fumes and take longer to dry. Latex paints, on the other hand, are easy to clean and dry quickly. However, they may not be as durable as oil-based paints and might not hold up to stains or moisture.
Choosing the right cabinet paint also depends on your personal preference for style. There are matte finishes that give off a classic, elegant feel or glossy ones that add a bright pop of color. Some homeowners prefer the durability of an enamel paint, while others enjoy the look of a chalk paint that gives cabinets a distressed and rustic appearance.
It’s important to remember that a new coat of paint doesn’t just protect the cabinet surface; it can dramatically affect the overall appearance of the room. To achieve a cohesive and polished look, you need to coordinate the color of the paint with other elements, including the flooring and wall paint, furniture, appliances, and accents.
If you have a limited amount of time to complete your cabinet painting project, you should consider using a water-based paint that dries quickly. This type of paint typically emits fewer volatile organic compounds (VOC) than oil-based ones, which can help you meet stricter environmental regulations. It is also a good option for homeowners who plan to use their cabinets frequently and want to be able to quickly update the color.
Finish
Cabinet painting offers homeowners a remarkable opportunity to revitalize the aesthetic of their kitchen or bathroom without the cost and hassle of a full-scale renovation. The application of a fresh coat of paint or stain can instantly transform the appearance of a room, creating an updated and visually appealing space that is sure to impress guests and increase the overall value of the home.
In addition to its visual appeal, a new layer of paint can protect cabinets from moisture and other environmental factors that can cause damage over time. Regular touch-ups and maintenance can extend the life of a newly painted cabinet and help ensure that it continues to look its best for years to come.
The first step in cabinet painting is to prepare the surface by sanding it to create a smooth and even texture. Then, high-quality primer is applied to ensure that the paint adheres well and offers a durable finish. Following this, multiple coats of paint are applied to achieve a rich and vibrant finish. Depending on the type of paint used, it can take between two and four weeks for the freshly-painted cabinets to fully cure and harden. During this time, it is important to avoid heavy use of the space to prevent accidental damage or marks.
Once the cabinet paint has dried, a protective topcoat can be applied to protect the finish against moisture and other environmental factors that can cause damage. This can also add a layer of shine and make it easier to clean.
There are a variety of different finishes available for cabinet painting, allowing homeowners to craft a bespoke aesthetic that aligns with their style preferences and personal tastes. A new coat of paint can also be an excellent opportunity to update the hardware, such as handles and knobs, for a completely new look.
While cabinet painting can be a DIY project, enlisting the help of a professional painter will ensure that the job is done properly and to your satisfaction. Reputable painters will have liability and workman’s compensation insurance, as well as a warranty on their work, providing peace of mind that any issues will be addressed quickly and efficiently.